Do you have to film the occasional interview, webcam session, video conference or webinar?
Do you need a quick, inexpensive, good looking video light for those sessions?
Well, you can build your own DIY beauty dish video light for less than $10 (plus another $40 for a decent LED light bulb) – and I’ll show you how step by step in this article.
DIY Beauty Dish Video Light Materials
I built my beauty dish video light from a handful of materials from the Dollar Store and hardware store – here is the parts list:
- LED spotlight
- Table lamp light socket
- Large plastic bowl
- White sheer curtain
- Spray paint (optional)
- 1/2 CTO Gel (optional)
- Tinfoil (optional)
- Steel bracket
- Steel “L” angle
- Brass stud & miscellaneous hardware
- Wire with outlet
- Gaffer tape (or other tape)

I ended up using a high CRI (CRI>90) 17W, 1250 lumens, daylight balanced (5000K) LED spotlight ($37.99 from Amazon).

The table lamp light socket I used was from Home Depot – but you can pick one up at Amazon for $3.28.
Some come with the lamp outlet connected, some (like the one from Amazon), you have to wire yourself – so you might also need some lamp wire and a plug.


I happened to find a large white plastic Halloween candy bowl on clearance at the Dollar Store, and I bought a cheap white sheer curtain while I was there too.
It took a little bit of searching to find a sheer curtain that was polyester (not cotton or a natural fibre), relatively sheer and as close to pure white as possible (without a pattern or design).
The bowl is 15″ (380mm) in diameter and 6″ (150mm) deep.
Everything else were odds and ends that I had laying around in the garage or my gear closet.
DIY Beauty Dish Assembly
The design of my beauty dish was controlled by the type of LED light that I had available.
Because I was using a spot light, I had to assemble the light so that the spotlight was directed to the back of the dish and then reflected forward. If I could have found a suitable A19 format LED bulb, I probably would have mounted the bulb facing forward instead.
I could have left the inside of the bowl white, but I wanted to reflect as much light as possible, so I painted the inside silver. I also added a circle of tinfoil (shiny side up) at the base of the bowl to help reflect the maximum amount of light forward.
Then I painted the outside black (just so it looked a bit more presentable).
Next, I put together a mounting bracket using a thin piece of steel I found in the garage (I think it was originally from a shelving unit) and a hardware store steel ‘L’ bracket.
The lamp socket is made with a mounting screw on the back with a small nut – which connects the socket to the bracket.
I had to drill out the holes on the steel bracket and ‘L’ bracket to accept the overside lamp socket mounting screw diameter.
The mounting bracket is finished off with a brass stud so that the finished beauty dish can be supported by a standard photography bracket.


Once the bowl was done, I installed the LED bulb.
The LED bulb I used is daylight balanced to 5000K – but the overhead pot-lights in my studio (where I am planning on using this light) are warm LED and balanced to 3500K.
In order to make sure that the two light sources were compatible, I added a 1/2 CTO gel to the front of the LED bulb – taped on with some gaffer’s tape.

At this point, you could use this light as-is. However, I knew that I would be using my beauty dish in very close, so I decided to add a white sock to the front to improve the quality of light (at the expense of a few lumens).
I cut the sheer curtain to fit around the bulb and then taped the edge with gaffer’s tape around the perimeter of the bowl.


The last step was to mount the completed beauty dish on an umbrella bracket ($24 from Adorama) and a small light stand.
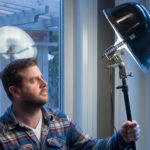
Here is my finished DIY beauty dish video light.


With the light on, the quality of light is very nice – although with just a single 17W LED hardware store lightbulb, it’s not particularly bright.
This isn’t a problem for a small portrait lighting in a dim setting – such as with a webcam or one-on-one interview in studio – but it’s not going to work from across the room, or outdoors.
In the following photos you can see the nice even distribution of soft light from the beauty dish, and the effect the 1/2 CTO gel has compared to the cool ambient light outside.


Theoretically, you could add a dimmer to control the intensity of the light – but in practice this isn’t really necessary.
As mentioned, a lot of light is lost by being reflected from the back of the bowl and being passed through the 1/2 CTO gel and through the white sock.
So instead of controlling the intensity of the light with a dimmer, it is much easier to either physically move the light closer or further away from your subject, or adjust your camera’s ISO or aperture to the correct exposure.
The post DIY Beauty Dish Video Light for Less Than $50 appeared first on DIY Photography.
DIYphotography.net is one of the world’s most popular photography blogs with over 1,500,000 monthly views.
JP Danko’s weekly column is published every Thursday.


