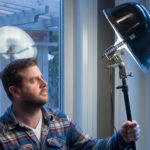
Almost everyone uses a webcam for business.
Whether it’s a client video conference, webinar, video chat, screen capture tutorial or your vlog, how you look on your webcam reflects how your business is presented to the world.
So, have you noticed that almost everyone looks terrible on their webcam?
Well, in this article I will give you a few tips to look good on a webcam, video conference or webinar.
There are three key technical factors that will make sure you look your best on a webcam.
Of course, you should also present yourself how you want to be seen by others – ie. do your hair, wear something appropriate, smile and sit up straight.
Remember you are representing your brand and how you look goes a long way towards how your brand will be judged.
WEBCAM LIGHTING
The most important factor to look good on a webcam is to upgrade your webcam lighting.
Most people rely on whatever ambient light is available when they happen to be on a webcam – which is usually very dull interior office lighting.
If you’re lucky you might have a nice bright window available – but it’s not always sunny…or daytime.
Further, there are two distinct zones in every webcam composition that should be considered – your face and the background.
With overhead ambient light these two zones almost never balance – so to expose your face correctly, your webcam will overexpose the background – or use some sort of nasty gain algorithm to boost the shadows.

Ambient Webcam Lighting
Here is an example in my office with overhead LED pot lights (which are actually pretty good quality light sources compared to a lot of generic office lighting).
You can see that my face is underexposed, while the background is overexposed, and because the webcam’s picture control software is trying to even everything out – the whole thing just looks awful!
To improve this situation, I use a DIY beauty dish video light to light my face with a nice soft flattering light, while I dim the overhead ambient lights to underexpose the background.
(Here is a link to my DIY Beauty Dish Video Light for Less Than $50 if you would like to make your own).

Desk setup for capturing good quality webcam video.
This is my desk setup for capturing video on the webcam.
The advantage of a beauty dish is that it produces a nice soft high quality light – but if you don’t have one or don’t want to make one – almost anything is better than nothing.
Try using a desk lamp reflected off a wall or a table lamp with a white lampshade instead – just place your lightsource slightly above and slightly to the side of your face.
WEBCAM BACKGROUND
Obviously your face is the most important part of a typical webcam shot, but people always forget about the background!
What is in the background gives viewers subliminal messaging about your business and how you operate – so it should never be an afterthought.
Most importantly, clean up all clutter, your dirty laundry and anything else that is not related to the impression of your brand that you want to project to your webcam video viewers.
Remember, you are in control of this space and what is and isn’t in the webcam frame – make it look good!

Webcam background.
This is the background in my office.
I’m a photographer, so I have an interesting photo hanging on the wall that is consistent with the style of work that I want my brand to be associated with (I specifically ordered this print for this purpose).
Then there is a simple barn board shelf with various cameras and lenses, related to what I do and some neat, tidy and stylish office cabinets.
The cat is just a bonus 😉
I don’t love the open cupboard (I need to put a door on it) and I think I will paint the white electrical outlets the same color of the wall – but for now it’s not bad.
WEBCAM QUALITY
No matter what webcam you’re using, the quality isn’t going to be that impressive.
I use a Logitech C920 ($50 on Amazon) webcam which is a fairly inexpensive 1080p webcam.
Whatever webcam you’re using, you can improve how it looks with a few simple webcam setting adjustments.
First, because of their small sensors and high compression, webcams tend to really suffer in low light, so try to make your webcam video lighting as bright as possible.
Next go into your webcam’s settings menu and manually set your camera controls.

Webcam settings to look better.
Here are the settings for the Logitech C920 – I toggled off the “Right Light” setting and the “Auto” exposure/gain and “Auto” white balance settings as well.
With all of these settings set to auto, the webcam always tries to expose for the background (because it’s not programmed to recognize a dedicated video light) and for some reason it always sets the white balance to Trump tangerine.
With most webcams there is also a setting that allows you to slightly zoom in and pan and tilt the camera. This is a good option to crop out anything around the edges of the background that you might want to hide.
Manually controlling these settings allows me to tweak the image to look how I want it to look.
And since I am usually in the same setting with the same lighting, once they are saved, I don’t have to re-adjust them.
PS – DON’T FORGET ABOUT THE AUDIO
Hey, now that you’re going to do all that work to look great on your webcam – don’t forget about the audio!
That little microphone built into your webcam is too small and too far away to record decent audio.
Use a lavalier mic or a desktop mic instead.
I use a Blue Nessie ($99.99 from Amazon) which is an easy to use, good quality desktop mic.

Audio microphone for the best sound on a webcam video conference or webinar.
LOOK GOOD ON A WEBCAM FOR YOUR NEXT WEBINAR
And here is the finished webcam image – it’s not perfect, but I think that it looks quite a bit better than average – properly exposed subject with good light, interesting and clean underexposed background, good white balance.

After DIY Webcam Beauty Dish
The post How To Look Good On A Webcam or Vlog appeared first on DIY Photography.
DIYphotography.net is one of the world’s most popular photography blogs with over 1,500,000 monthly views.
JP Danko’s weekly column is published every Thursday.


